
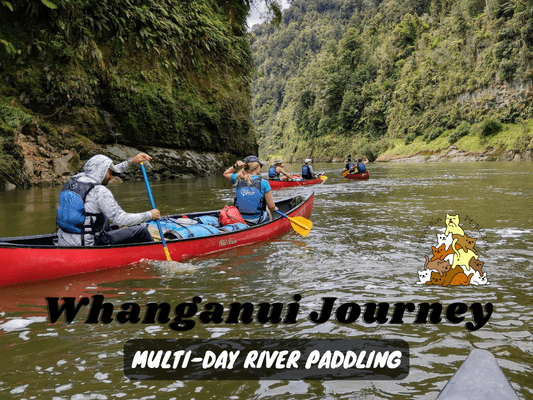
Whanganui River Journey - Great Walk on a Canoe
The Whanganui Journey is the only New Zealand Great Walk that can be done only by paddling, instead of tramping on foot. The journey takes place on the scenic Whanganui River through the remote Whanganui National Park. Good fitness and confidence paddling a canoe are essential for the Whanganui Journey. Also, you need to know how to swim!
Getting To/From The Whanganui River & Where To Start Your Whanganui Journey
The Whanganui Journey has multiple start points along the Whanganui River, depending on your skill level, and the distance and number of days you plan to paddle on the river. The journey moves downstream and ends at Pīpīriki. These are the typical starting points you can choose:
- Whakahoro to Pipiriki (easy, 87km, around 3 days): A great option for beginner paddlers. You have more time to familiarize yourself with controlling the canoe before entering any rapids. Also, you will start in the most beautiful and scenic part of the river, so no worries about missing out the scenery from upstream.
- Ohinepane To Pipiriki (intermediate, 123km, around 4 days): Suitable for paddlers who have had some experience and want to see more of the river. You will start in a shallower and faster section of the river. Moreover, you will cross rapids on your first day, before reaching the calmer section at Whakahoro.
- Taumarunui (Cherry Grove) to Pipiriki (hard, 145km, around 5 days): Recommended for experienced paddlers who can paddle around obstacles confidently. This is the full stretch of the Whanganui Journey and it starts at the shallower and faster section of the river.
It is a one-way journey down the river. So, unless you own a canoe/kayak, and have someone to drop off or pick you up from the river points, hiring a canoe with shuttle bus service is a no-brainer.
Whanganui Journey River Canoe Rental & Shuttle Service

The best service provider I found is the local family-owned Whanganui River Canoes. The team knows the river very well and that’s very important for the safety of paddlers. They closely monitor the weather conditions and river levels to ensure it is safe before putting paddlers on the river. Furthermore, their Old Town Discovery 169 Canadian Canoes and equipment are of high quality and in tip-top conditions.
In addition to canoe hire, it also comes with shuttle service (plus secure car park and storage) to and from the river start and ending points. Life jackets, river maps, waterproof storage barrels & box, and one personal locator beacon (PLB) device for each group are provided. At the end of your trip, you’ll be welcomed with drinks, snacks, and a hot shower!
Note: Due to safety reasons, Whanganui River Canoes do not put solo paddler on the river. You need to have at least two pax to make the booking. Furthermore, the trip is very much weather dependent: If the river is deemed unsafe for the dates of your booking, you have the option to change the date. Else, a full refund and cancellation will be given to you for your canoe hire and DOC accommodation bookings.
Whanganui Journey Great Walk Booking
All Great Walks in New Zealand require booking in advance for the huts and campsites. Off-site camping is not allowed on the Great Walk tracks. Here is the DOC online booking site for all Great Walk accommodations. Since it wasn’t as busy as the other great walks and it wasn’t during peak season, I got to make the bookings close to the dates of my trip.
Other than the great walk bookings, you should also sort out the canoe hire and shuttle service (explained above) and the accommodation for the day before your great walk (to be explained below).
Oh, and before you book all your huts / campsites from DOC, you should know there is an alternative place to stay on your last night of the Whanganui Journey. Check out the luxury yet wild Bridge to Nowhere Accommodation. The place offers a lodge (optional catered buffet dinner and breakfast), cabins and campsites, with hot showers, cook house & BBQ, and even a fully licensed bar! And guess what, the price for the cabin is the same as the DOC’s Tīeke Kāinga hut at the opposite side of the river, and the campsite is a dollar cheaper than Tīeke campsite, all with these luxuries you don’t get at DOC accommodation!
Things I packed for Whanganui Journey
- No hiking backpack this time as my things are packed in the provided waterproof barrels that fit nicely on the canoe.
- Forclaz Trek 100 三季圆顶帐篷 (比大多数帐篷重,但抗风性和防水性非常好)
- PTT Outdoor 的 HIGH PEAK 便捷旅行睡袋 (首次购买最低 RM100 即可优惠 RM10,优惠码“MEOW”,仅限马来西亚境内)
- TOMSHOO sleeping bag liner
- 充气床垫和枕头
- Quechua 登山雨衣
- Sun Protect 长袖跑步 T 恤 + Quechua Hiking Fleece Jacket + 速干跑步短裤 + Kiprun 跑步袜 (for the day)
- Ski base layers top + pants + warm hiking socks + gloves from Decathlon (as sleepwear)
- Extra 羽绒服 (didn’t use but important to bring, just in case)
- Sandals (since there’s not much walking on track, the waterproof Adidas Kampung is also a good option)
- Flip flops (for walking around campsites / huts)
- Sun hat
- Gloves to prevent blisters from paddling
- 急救箱,指南针和哨子
- 充电头灯
- Phone (with booking confirmation pdf file), powerbank & charging cables
- Food and snacks (muesli, crackers, canned creamed rice, apples, energy bars, bread and jam), paper towels, rubbish bags
- Water bottles (2-3L)
- HydroBlu 轻型滤水器
- CuloClean 便携式射水头, some toilet paper
- Toothbrush, toothpaste, hand sanitizer, soap, hair brush
- Fire lighter (for emergency, useful for lighting fire wood if staying in a hut)
- 折叠剪刀
透明度万岁!:这里某些链接是会员链接,如果您用此链接预订的话,我可以赚取佣金, 而你也不会被收取额外费用。 我只推荐我使用的产品和公司。您的支持可以帮助我保持网站的运行,让我继续用心分享🙂
The Day Before: Raetihi Holiday Park

Raetihi Holiday Park is owned by the same company as Whanganui River Canoes. It is also the place where the shuttle picks up paddlers in the morning to the river. At the end of your trip, the shuttle will take you back to the holiday park with ‘welcome back’ drinks and snacks. Safety briefing is done here in the afternoon/evening, the day before the trip, but it is possible to arrange to have the briefing at 6.30am in the morning of your trip, or to arrange an online briefing if you cannot be there a day before your trip.


We (me and a friend from Germany whom I met working together as horse catchers/walkers during our New Zealand working holiday period) stayed at the unpowered campsite in the holiday park the day before our paddling trip. The Forclaz 2 Person Dome Tent I brought for this trip is quite spacious to fit both of us.
Whanganui Journey Day 1
As both of us considered ourselves as beginner paddles, we opted for the 3 days, 87km option, beginning our Whanganui Journey at Whakahoro. It turned out to be a very chill, no rush journey. We did this in the beginning of summer (early December) so it wasn’t too hot or cold.
Whakahoro to John Coull Hut (37.5km)

The shuttle left at 8am and it took around 1.5 hours to reach Whakahoro starting point. After some canoe steering, rapid maneuvering, docking and rope tying instructions, we began our canoeing trip around 10am. On a 2 person canoe, the front paddler is the ‘power engine’ to push forward, while the back paddler controls most of the steering. We took turns and switched positions each day.
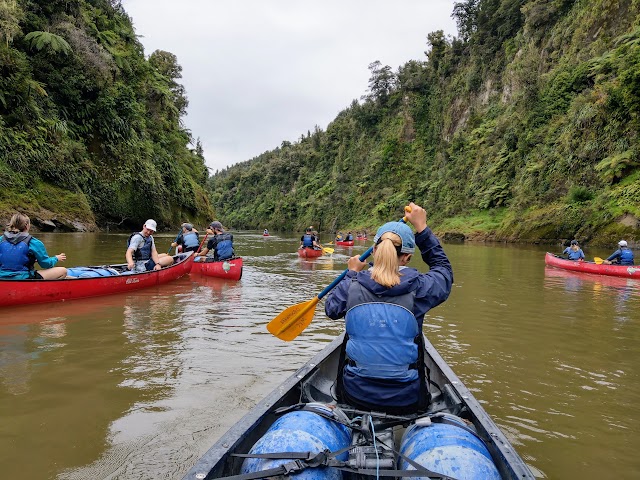
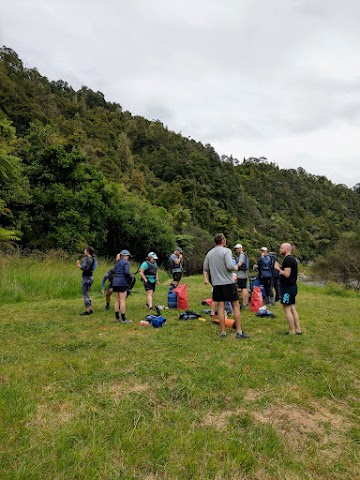
There was another big group doing the same trip with us, so we decided to stick together with them. Turns out, they are a cheeky kiwi group of friends who had done the whole Te Araroa Trail (tramping the whole New Zealand from end to end) except for this part which they couldn’t do due to bad weathers. Now, they returned here to fill this gap to finally complete 100% of Te Araroa Trail.
(During this trip, we actually paddled really slowly as we waited for the other group. We tried paddling as slow as we could, but somehow the group still got left behind. So most of the time we didn’t really paddle and just let the river carry us forward, which we found out that’s what the other group was doing haha, and that wasn’t a bad idea! Even with this very chilled pace, we had more than enough time to reach our destinations.)

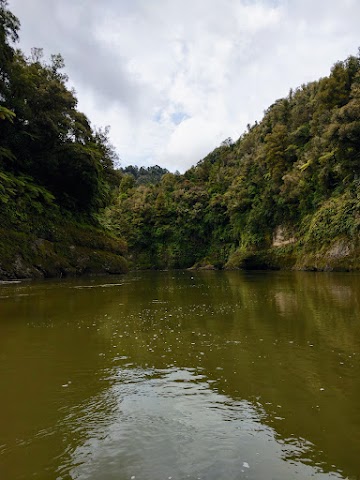
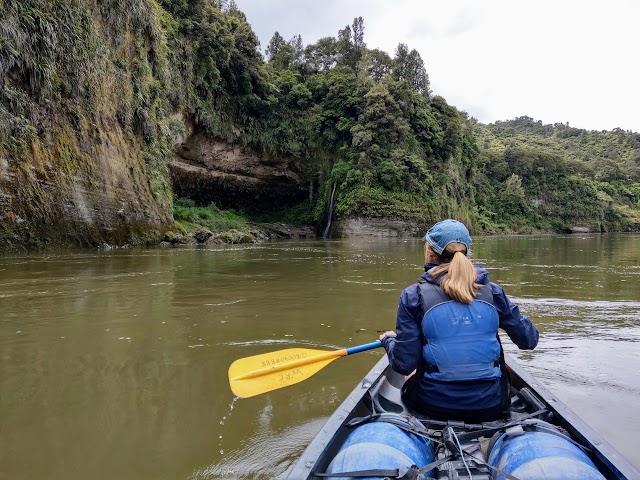
The water level was a little higher due to the recent rain. Overall, paddling downstream along the Whanganui river was very chill and easy. Most of the time, we just let the calm water current slowly push us forward, paddling every once in a while to straighten our canoe.
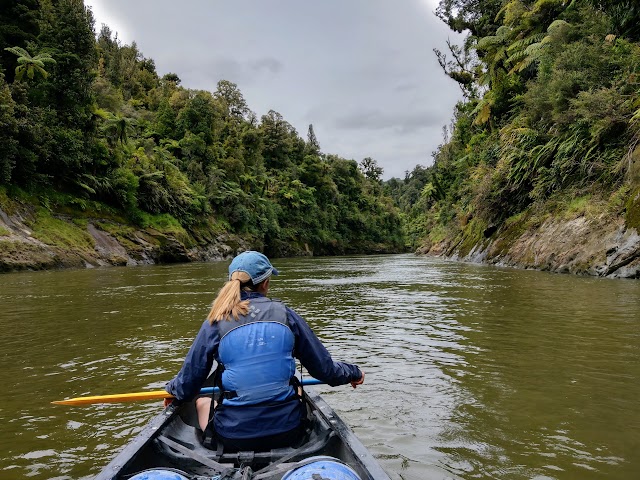
The river flows in between the beautiful green-clad Whanganui gorge. Notice the bare plantless river banks? That’s how high the river could rise during heavy rainfall!


Many mini waterfalls along the way.

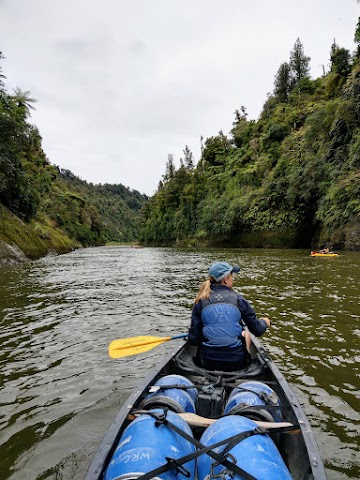
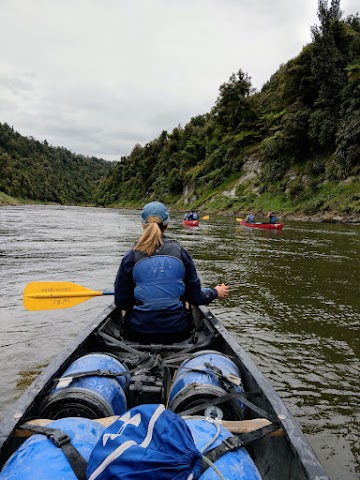
These waterproof blue barrels are provided together with the canoe to store our things. In case of capsizing (which we didn’t, fortunately), our things will stay dry. They can be secured onto the canoe, or to be taken out to the shores or campgrounds during docking.
Mangapapa Campsite

11.50am: We docked at Mangapapa Campsite to have our lunch break. Some sand flies around.

Campground shelter and rain water supply.

Two experienced kayakers stopped by.

We continued paddling at 1.15pm. This photo wasn’t an actual rapid but I couldn’t take photos of the rapids we went through as both of us needed to focus and paddle with both hands through the rapids. Mostly, the rapids we encountered were mild and easy to handle. There is only one rapid that poses a challenge, they called it the ‘50/50’ (50% chance you’ll get through nicely, 50% chance you’ll fall into the water haha). However, you will only encounter that 50/50 rapid on the last day, at the very last section before you dock at the ending point.
The technique for rapid maneuver is to steer into the middle of the ‘Ʌ’ shape whitewater flow (so the canoe doesn’t get pushed by the current from the side), try to paddle faster than the river flow (so the canoe doesn’t get turned around by the water pushing from behind), while keeping the canoe as straight as possible.
Sacred Tamatea’s Cave
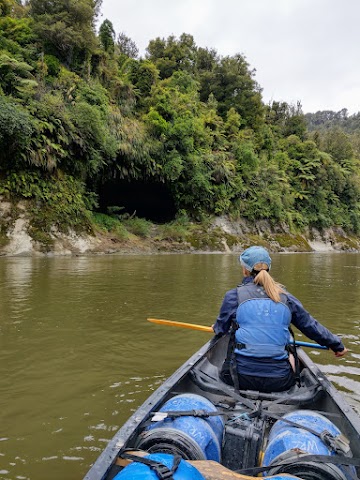
2.07pm: After passing the Tarepokiore (whirlpool) rapid, you will find a large overhang known as Tamatea’s Cave, named after a Maori explorer. It is a sacred place and one shall not enter the cave.

3.29pm: Signage of John Coull Hut. Each signage along the river tells you the distance and also on which side you need to dock, so you have the time to paddle towards the correct side of the river bank, as it is difficult to paddle right across ‘horizontally’ with the river flowing downstream. If you somehow, accidentally missed the docking land, it is tricky and tiring to paddle back against the flow, so be aware of the docking sites.
John Coull Hut & Campsite

3.43pm: Docking overnight at John Coull Hut and campsite. We secured our canoe to a pillar, unloaded the barrels and carried them to our campsite.

John Coull Hut


John Coull Campsite, where we set up our tent. It is interesting to see all the different shapes and sizes of everyone’s tent.
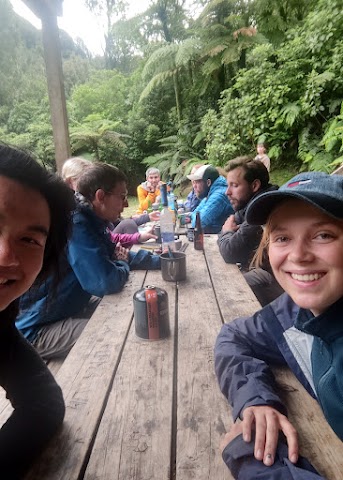
Hanging out with the group after dinner.

There is a spot behind the camp shelter that you could possibly see glow worms at night. At dusk, there is also the possibility to spot New Zealand’s only native land mammals, pekapeka (short-tailed and long-tailed bats), fluttering overhead around the area. With the pouring rain, however, we gave up and decided to stay dry in our tent, hoping the river wouldn’t rise too high, or else we would have to wait for it to recede and might get stuck at the campsite for a day or two.
Whanganui Journey Day 2
John Coull Hut to Tīeke Kāinga / Bridge to Nowhere Lodge (19km)

Next morning, we were delighted to see a clear sky. The rain had stopped and the river condition was excellent. A couple of ducks were hanging around the campsite.

9.40am: We departed John Coull campsite for our onward journey.

Paddle through more of the steep bush-covered hills.

10.59am: Some kind of ‘rock ceiling’ formation by the river bank.


11.01am: More mini waterfalls


12.05pm: Still sticking with the big group.
Side trip: Bridge To Nowhere - The Valley Of Abandoned Dreams

12.29pm: We docked at Mangapurua Landing for the track access to Bridge To Nowhere, an easy side trip done on foot. The landing was steep and can be slippery when wet. Disembarking and embarking the canoe can be tricky, especially when it’s congested with other canoes. Graciously, with the teamwork from everyone, we docked successfully with no issue, hopping from canoe to canoe onto land.

We had our lunch break by the river before entering the track to Bridge To Nowhere at 1.09pm.


Felt good to be in the shade surrounded by trees after paddling on an open river all the time.

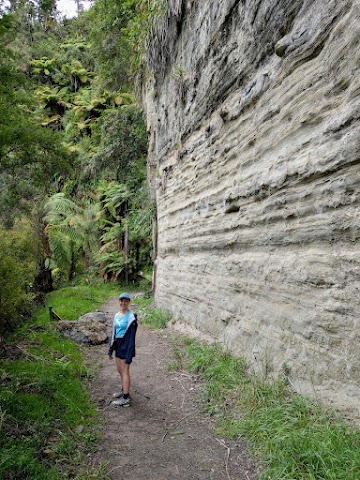
1.40pm: Tall vertical cliff wall. Not a place to linger due to rock fall hazard.
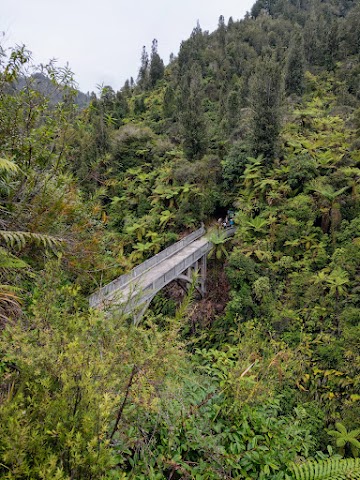
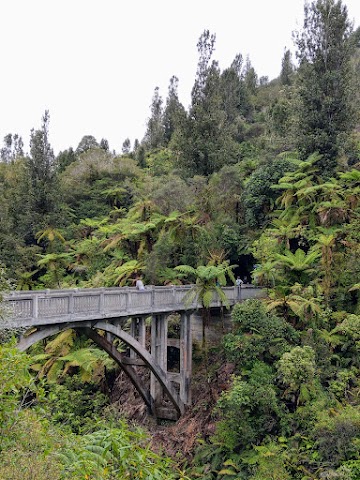
1.45pm: The Bridge To Nowhere. It took us 40 minutes of casual walking from the landing to the bridge.
The abandoned Bridge To Nowhere stands as the only intact reminder from a bygone era, a symbol of that ill-fated settlement in an area known as the “valley of abandoned dreams”. The lands around here were offered to soldiers who returned from WWI, under the Discharged Soldiers Settlement Act 1915. From 1917, veteran settlers took up land here on the promises of roads and access. There were around 40 families at the height of settlement, building new lives in the Mangapurua Valley. However, the land itself proved to be rugged and isolated. In 1942, there were only three families left. With nature working against these grand plans, everyone had gone by 1944, walking off from the valley empty-handed, penniless, some after over 20 years of back-breaking toil.

As for the story of the bridge: The early settlers had to cross the Mangapurua Stream by scrambling down and up the gorge walls. First a wire cage, then a suspension bridge, were built to improve accessibility, but fell into disrepair. In accordance with this, plans were established to build a dray bridge. Engineers discussed the type of bridge suitable for the area, but no one questioned the need for a bridge at all.
The construction of this ferro-concrete style bridge used 105 cubic meters of concrete and 15 tons of steel. With near-impossible access to the site, cartage expenditure was nearly equalled the cost of construction. Although impressed with the bridge, settlers presumed it was to advance the long-promised road access, they themselves had little use for the bridge by the time it was finally constructed.
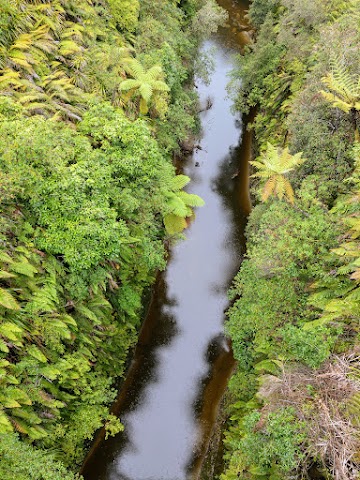
Below the bridge is the Mangapurua Stream. We spotted a few giant eels in the stream. (If you look closely at the photo you could spot them. Easiest to spot is the one at the bottom right, a long black figure in the water. The sky reflection and raindrops made it hard to see in the photo.)
Tīeke Kāinga / Bridge To Nowhere Lodge

We spent more time chilling on the river and also docking onto some random banks. At around 5pm, my friend and I arrived at Bridge to Nowhere Lodge.
The other group stayed at Tieke Kainga Hut & Campsite, which is on the opposite bank as you can see in the photo above. (Tieke Kainga is a unique place that functions as DOC’s great walk hut and campsite, but also is a functioning Marae, a Maori meeting ground. It could offer a unique cultural experience to visitors as you may be invited to participate in a welcome ceremony if whānau are present. Find out more about Tieke Kaing here.)


For us, we chose to stay at Bridge To Nowhere Campsite. It has hot showers! The lodge owner greeted us and told us that we were the only two people staying here tonight, some groups left yesterday, and a huge crowd will be checking in tomorrow. What luck!

Near the tent sites is a well sheltered cook house with BBQ, gas and water supply.
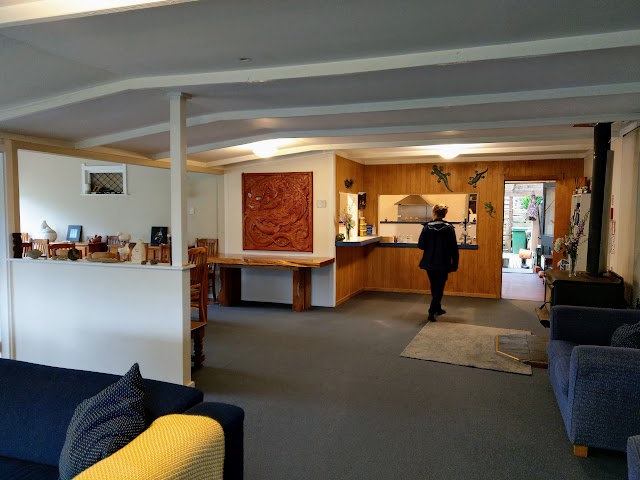
If you want something more of a luxury stay, the lodge is for you (catered breakfast and dinner buffet available too).
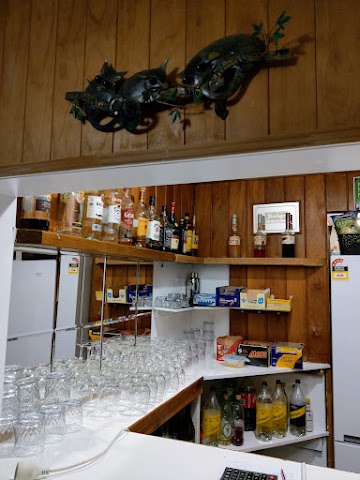
Kid not, Bridge To Nowhere Lodge has a full licensed bar, in the middle of nowhere!

A luxury place surrounded by nature.

The lodge owner offered us to stay in one of the huts since it’s empty, but we decided to sleep in our cozy tent instead. What a view!
Whanganui Journey Day 3
Tīeke Kāinga / Bridge To Nowhere Lodge to Pipiriki (21.5km)

Waking up to this view!

9.17am: After breakfast, we rejoined the group from the opposite bank as planned, and headed our way for our last day of paddling.


More mini falls
11.50am: Never run out of interesting landscape on the banks of Whanganui river. Before it gets too chilled, we occasionally encounter exciting rapids to paddle through.

Amazingly, we managed to shoot through the ‘50/50 rapid’ (Paparoa rapid for the actual name) without falling over into the river. It is the last and the biggest rapid to encounter, right before arriving at Pipiriki ending point. We landed at Pipiriki at 12.40pm.

Lastly, the shuttle picked us up and took us back to Raetihi Holiday Park, where drinks and snacks awaited.
帖子有帮到您吗?在您的登山故事和帖子中标记 @meowtainpeople 吧!

*地球队长经过* 记住,请保护我们的环境,请勿破坏大自然。不要留下任何垃圾,只带回照片和回忆(如果可以的话,还可以捡走一些垃圾)。请在指定的路径上行走,并尽量保持在中间行走,以使裸露的土壤不会进一步扩散/腐蚀。与大自然融为一体吧 *飞走了*
支持本网站的附属链接:
透明度万岁!:以上链接是会员链接,如果您用此链接购买或预订的话,我可以赚取佣金, 而你也不会被收取额外费用。 我只推荐我使用的产品和公司。您的支持可以帮助我保持网站的运行,让我继续用心分享🙂
想在您的网站进行相同的联属网络营销吗?用这个 AccessTrade 平台链接 获取 RM5 奖励。